Monday, April 25, 2011

Chicken Breast with Capers and Artichoke Hearts

I love artichokes! Artichokes are a very useful food.  They lend flavor and texture to a variety of different dishes.  One of my absolute favorite recipes is the Spinach and Artichoke dip that I got from the Olive Garden website.  I have since modified that recipe so that I do not have to buy Marscarpone Cheese, but still very delicious.  In this recipe, the artichokes add more than texture to the dish.  They had a very distinct flavor. I also love how the capers interact with the artichokes to give flavor.  In some previous recipes, I have substituted chopped green olives for capers, but I wouldn't make that substitute for this one.  They're just too important to the overall flavor of the dish.  This dish isn't for everyone, but we really loved it.

Chicken Breast with Capers and Artichoke Hearts
1 cup whole wheat or white flour
½ tsp. salt
1/8 tsp. white pepper, or to taste
1/8 tsp. black pepper, or to taste
2 lbs chicken breast tenderloins or strips
2 Tbs. canola oil
2 Tbs. extra-virgin olive oil
2 cups chicken broth
2 Tbs. fresh lemon juice
1 12 oz jar quartered marinated artichoke hearts, w/liquid
¼ cup capers
2 Tbs. butter
¼ cup chopped flat-leaf parsley

Combine flour, salt, and white and black peppers. Dredge chicken in seasoned flour and shake off excess. Heat canola oil and olive oil in a large skillet over medium-high heat. Add chicken breasts and cook until golden brown on both sides, and no longer pink on the inside; set aside. Pour in chicken broth and lemon juice. Bring to a simmer, scraping the bottom of the pan to dissolve the caramelized bits. Add artichoke hearts and capers, return to a simmer, and cook until reduced by half. Whisk butter into sauce until melted. Place cooked chicken back into pan, and simmer in the sauce for a few minutes to reheat. Serve on a platter sprinkled with chopped fresh parsley.


If you think you might be interested, give it a shot.  I wish I would have used angel hair pasta or rice, but Spaghetti was all I had on hand for some reason.  Maybe next time.  I hope you enjoy!!

Sunday, April 24, 2011

Italian Crusted Chicken with Tomatoes and Mozzarella

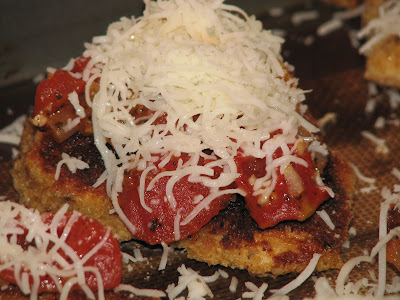
This dish is sort of inspired by an appetizer. It's a mixture between bruschetta and caprese. Instead of toasted bread I used breaded chicken tenders.  It's a great way to stretch a few chicken breasts between some additional people.  If you find yourself with only three chicken breasts, but four people to feed, pound out those chicken breasts and cut them into strips.  Sliced mozzarella might be easier than shredded.  It would probably stay put on the chicken slightly better. The fresher the mozzarella, the better. If, for some reason, you decide to make this recipe (and you definitely should because it's delicious) do not put the prepared baking sheet into the oven until just before you're ready to serve.  You want them to be fresh right out of the oven.

Italian Crusted Chicken with Tomatoes and Mozzarella
1 cup all-purpose flour
1 ½ tsp. salt
1 tsp. ground black pepper
½ tsp. cayenne pepper
1 egg
1 cup bread crumbs
2 Tbs. olive oil, or as needed
1 pound chicken tenders
2 Tbs. olive oil
1 can stewed tomatoes (w/ liquid)
4 cloves garlic, chopped
10 fresh basil leaves
1 small onion, chopped
salt and black pepper to taste
mozzarella cheese

Preheat oven to 350 degrees F. Whisk together the flour, salt, black pepper, and cayenne pepper in a bowl. In a separate shallow bowl, beat the egg. Place the bread crumbs into a third bowl.

Heat olive oil in a skillet over medium heat. Dip each chicken tender into the seasoned flour, then into the egg; roll in crumbs. Pan fry the chicken tenders until golden brown on both sides, about 4 minutes per side. Transfer the chicken pieces to a baking sheet.

Heat 2 Tbs. olive oil in a skillet over medium heat, and stir in the tomatoes, garlic, basil, onion, and a pinch of salt and black pepper. Reduce heat and simmer the tomato sauce until it starts to thicken, stirring often, about 10 minutes. Spoon about 1 Tbs. of sauce over each chicken piece; top with a half piece of mozzarella cheese.

Bake in the preheated oven until the cheese is melted and bubbly, 8 to 10 minutes.

Definitely try this recipe!  It was very delicious.  I think this recipe could also make a great appetizer.  Cut the chicken breasts into smaller bits and cut your tomatoes up just a little.  Enjoy!!

Sunday, April 17, 2011

Chicken Scarpariello

It's been a while since I've cooked or posted any new recipes.  When I went looking for something to post as I return from my little 'blogging vacation' I wanted to find something that didn't have a high fat content.  While this dish isn't really healthy, it definitely isn't laced with cheese and other fatty foods that I love. I felt this dish was very tasty.  I would've made a few changes, however.  I would have pounded out the chicken breasts.  I also would have browned them on a higher temperature before first removing them from heat.  I would then cut the temperature down while reducing the wine sauce.  I feel that chicken is much better when cooked at a lower temperature for a longer period of time.  I'll adjust the recipe that I post to reflect the changes that I would make.

Chicken Scarpariello
1 ¼ lbs skinless, boneless chicken breasts
3 Tbs. all-purpose flour
2 Tbs. olive oil
2 tsp. butter
2 Tbs. shallots, minced
2 cloves garlic, minced
1 cup water
½ cup white wine
1 cube chicken bouillon
½ tsp. dried rosemary, crushed
¼ tsp. salt
1 pinch ground black pepper

Cut chicken breasts into 1 x 3 inch strips, and dredge in flour. In 10 inch skillet, heat oil and butter (on medium-high heat). Add chicken. Cook, turning occasionally, until lightly browned on all sides (3 to 4 minutes). Using tongs, remove chicken from skillet and reduce heat to medium. Set aside and keep warm. Add shallots and garlic to the skillet. Sauté until softened (1 minute). Add water, wine, bouillon, and seasonings. Mix well. Cook, stirring frequently, until liquid is reduced by ½ (3 to 4 minutes). Return chicken to skillet, and cook until sauce is thick and chicken is heated through (2 to 3 minutes).


Add a delicious side of green beans and pasta and enjoy!

Tuesday, April 12, 2011

Hiatus

I'm really sorry that I haven't been posting lately. I have been involvednwith two musicals that have been taking up a large portion of my time. I will give you something to look forward to, though. I am hoping to find some great recipes for the outdoor chef. See you soon!!

Sunday, February 27, 2011

Scramblewiches

My friend Stephanie and I first tried this recipe about three and a half years ago and we absolutely loved it.  This recipe is from Rachael Ray's 30-minute meal cookbook, "365: No Repeats".  If you try this recipe and like it, I highly recommend the cookbook.  We tried several recipes from it and enjoyed lots of tasty creations.  When I say that 'we tried', I truly mean, that Stephanie made them and I helped eat them.  At that time, I wasn't much of a cook (very little experience).  I really love this recipe I'm sure that if you like ham and eggs, you love it too.  Try it for breakfast or dinner, either way your stomach will appreciate it!

Scramblewiches
1 baguette (day-old is fine)
2 Tbs. butter
½ lb. deli-sliced ham
8 large eggs
splash of milk
1 tsp. hot sauce
salt/pepper
Swiss cheese

Preheat the oven to 200 degrees F.

Crisp the bread on the lower rack of the oven for 5 minutes and then remove. Then split it lengthwise, and hollow it out. Cut each bread in half again, across, making 4 boats. Switch the broiler on.

Heat a large nonstick skillet over medium heat. Add the butter and melt it. When the bubbles stop, add the meat and cook, separating pieces, for 3 minutes, or until brown at the edges. In a bowl, beat the eggs with milk, hot sauce, salt and pepper. Add to the meat and scramble, keeping the eggs little soft. They will continue to cook in the oven.

Divide the eggs among the bread and cover with the cheese. Melt the cheese under the broiler. Take it out as soon as the cheese softens and melts. Do not brown or allow the cheese to bubble; there are eggs under there!


Try it soon and enjoy it often!!

Sunday, February 20, 2011

Chocolate Mousse

I had a hankering (yes a hankering) for a light fluffy and very delicious chocolate mousse.  I think this recipe is absolutely right on the money.  It's so delectable and definitely less filling than a piece of cheesecake or slice of pie. It's also not as sweet (and really doesn't need to be). I highly recommend this recipe and suggest to anyone who makes it that they double or triple the recipe.  I doubled it and it made enough for three to enjoy a reasonable amount.

Chocolate Mousse
¼ cup semisweet chocolate chips
1 Tbs. water
1 egg yolk, lightly beaten
1 ½ tsp. vanilla extract
½ cup whipping cream
1 Tbs. sugar
Whipped cream

In a small heavy saucepan, melt chocolate chips with water over low heat; stir until smooth. Stir a small amount of hot chocolate mixture into egg yolk; return all to the pan, stirring constantly. Cook and stir for 2 minutes or until slightly thickened. Remove from the heat; stir in vanilla. Cool, stirring several times.

In a mixing bowl, beat whipping cream until it begins to thicken. Add sugar; beat until soft peaks form. Fold in cooled chocolate mixture. Cover and refrigerate for at least 2 hours. Garnish with whipped cream if desired.


Make it soon and enjoy it often!! It's worth the effort!

Thursday, February 17, 2011

Orange Braised Bourbon Chicken

I was intrigued by this recipe as soon as I saw it.  I was enticed by the flavor I imagined when I heard orange and bourbon in the title together.  I must admit that I don't keep bourbon around the house and buying it for this recipe wasn't really worth the trip to the store.  I felt that there were just too many flavors in this dish and the texture of the sauce was slightly reminiscent of apple sauce.  If you like sweet dishes with a sort of Asian flare, try it.  It wasn't difficult to prepare.  It did, however, take a great deal of time (which I spent on the couch watching TV and waiting).  I learned a lot by preparing this recipe.  I feel that my journey to becoming a better cook, was advanced by making this sauce and learning about the flavor combinations.  Ultimately, I believe it was the raisins that pushed the sauce over my flavor threshold. 

Orange Braised Bourbon Chicken
4 skinless, boneless chicken breast halves
½ tsp. salt
1/8 tsp. ground black pepper
¼ cup all-purpose flour
3 Tbs. butter
2 Tbs. brown sugar
2 Tbs. cornstarch
1/8 tsp. ground allspice
1 cup hot water
¼ cup orange juice
2 Tbs. bourbon whiskey
¼ cup chopped raisins
4 slices orange

Sprinkle chicken with salt and pepper, then dredge in flour. Melt butter in a large deep skillet over medium heat and brown on both sides. Remove chicken from skillet and set aside. Stir brown sugar, cornstarch and allspice into skillet; gradually stir in water. Reduce heat to low and simmer, stirring constantly, for about 5 minutes or until mixture is smooth and thick. Stir in orange juice, bourbon and raisins. Return chicken to skillet and top each breast with an orange slice. Cover skillet and simmer for about 35 minutes, or until chicken is cooked through and no longer pink inside. Serve chicken with sauce.


Feeling adventurous?  Give it a shot!  Let me know how it turns out.

Tuesday, February 15, 2011

Key Lime Pie

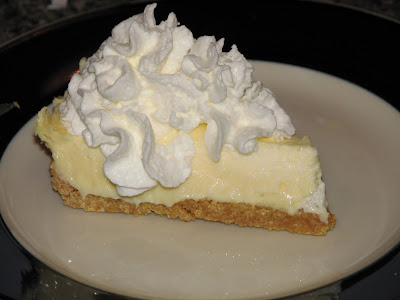
What better way to welcome Spring than with a delicious Key Lime Pie.  To me, the light a fluffy texture and the crisp lime flavors are the most Spring-like in my entire recipe box. This recipe tastes very delicious and while, not the easiest version, it's very authentic.  I opted not to make my own whipped cream for this pie, because I already had some in the refrigerator.  I also chose to leave out the lime slices.  I didn't see any reason to add lime slices for decoration when I had no intention of eating any of them. 

Key Lime Pie
1 cup graham cracker crumbs
3 Tbs. white sugar
5 Tbs. butter, melted

Preheat oven to 325 degrees F (165 degrees C). Mix graham cracker crumbs with sugar and melted butter. Press into 9 inch pie plate and bake for 5 minutes. Remove from oven and let cool.

3 eggs
½ cup key lime juice
1 (14 oz) can sweetened condensed milk
1 pinch salt
1 pinch cream of tartar
1 cup heavy whipping cream (opt.)
1 lime, sliced (opt.)

Separate 2 of the eggs, placing the two egg whites into a mixing bowl. Reserve the yolks in another bowl. To the yolks, add one whole egg, lime juice and sweetened condensed milk. Whisk until smooth.

With clean mixer blades or a whisk attachment, beat the egg whites with salt and cream of tartar until stiff, but not dry. Fold whites into filling mixture. Pour filling into partially baked crust. Bake in preheated 325 degrees F (165 degrees C) for 10 to 15 minutes or until set.

Let cool at room temperature, then freeze 4 hours to overnight. Just before serving, whip cream to form stiff peaks. Serve decorated with whipped cream and lime slices.


This pie is very delicious.  I can't wait to have another piece!!  I hope you enjoy!

Thursday, February 10, 2011

Braised Balsamic Chicken

If you're looking for a flavorful new recipe, this is the one.  This tender, braised chicken breast is absolutely delicious.  The aromas that flowed through my kitchen while this was simmering made it very difficult to wait until it was ready to eat.  I will say that the look of this chicken seems drastically dark, but the flavor of the balsamic vinegar isn't overwhelming as I thought it would be. I felt that the side I chose (green beans and red potatoes) paired perfectly with this dish.  In fact, I made extra beans and potatoes to save for another meal. Give this meal a try, it isn't difficult and doesn't require loads of ingredients that are really random.  I actually chose this recipe because I had every ingredient in my pantry already.

Braised Balsamic Chicken
6 skinless, boneless chicken breast halves
black pepper to taste
1 tsp. garlic salt
2 Tbs. olive oil
1 onion, thinly sliced
½ cup balsamic vinegar
1 (14.5 oz) can diced tomatoes
1 tsp. dried basil
1 tsp. dried oregano
1 tsp. dried rosemary
½ tsp. dried thyme

Season the chicken breasts with ground black pepper and garlic salt. Heat olive oil in a medium skillet, and brown the onion and seasoned chicken breasts.

Pour tomatoes and balsamic vinegar over chicken, and season with basil, oregano, rosemary and thyme. Simmer until chicken is no longer pink and the juices run clear, about 15 minutes.


Green Beans and Potatoes
For this side, I simply cut up approx. 5 or 6 small red potatoes and put them in the bottom of a medium-sized sauce pan. I then opened two cans of unsalted green beans and poured them over the potatoes.  I added garlic salt, onion powder and chicken bouillon powder. I added enough water to cover the beans and potatoes and mixed everything together.  I put them on high heat and brought to a boil.  Once they were boiling, I covered them and let them simmer on low heat until the potatoes were tender.

Wednesday, February 2, 2011

Cocoa Brownies with Browned Butter and Walnuts

My best friend, William, who lives in Cleveland, OH and sent me this recipe for the most amazing brownies this week.  He got the recipe from a website (which I will include). The website also includes approximate nutritional information for this recipe.  I believe that these are the most 'fudge-like' brownies that I have ever made. It was also a great opportunity to use my new perfect brownie pan (which I highly recommend).  I got the pan as a gift for Christmas and it is amazing!!  Each brownie is like an edge brownie and they're all perfectly sized.  My personality definitely appreciates same-sized brownies. If you choose to make this recipe, they are even better the second day, so you might want to plan ahead. 

Cocoa Brownies with Browned Butter and Walnuts
Nonstick vegetable oil spray
10 tablespoons (1 1/4 sticks) unsalted butter, cut into 1-inch pieces
1 1/4 cups sugar
3/4 cup natural unsweetened cocoa powder (spooned into cup to measure, then leveled)
1 teaspoon vanilla extract
2 large eggs, chilled
1/3 cup plus 1 tablespoon unbleached all purpose flour
1 cup walnut pieces

Position rack in bottom third of oven; preheat to 325°F. Line 8x8x2-inch metal baking pan with foil, pressing foil firmly against pan sides and leaving 2-inch overhang. Coat foil with nonstick spray. Melt butter in medium saucepan over medium heat. Continue cooking until butter stops foaming and browned bits form at bottom of pan, stirring often, about 5 minutes. Remove from heat; immediately add sugar, cocoa, 2 teaspoons water, vanilla, and 1/4 teaspoon (generous) salt. Stir to blend. Let cool 5 minutes (mixture will still be hot). Add eggs to hot mixture 1 at a time, beating vigorously to blend after each addition. When mixture looks thick and shiny, add flour and stir until blended. Beat vigorously 60 strokes. Stir in nuts. Transfer batter to prepared pan.

Bake brownies until toothpick inserted into center comes out almost clean (with a few moist crumbs attached), about 25 minutes. Cool in pan on rack. Using foil overhang, lift brownies from pan. Cut into 4 strips. Cut each strip crosswise into 4 brownies.


I used regular salted butter and I felt like it made no difference whatsoever. 
You will love these! I sure did. Enjoy

Monday, January 24, 2011

An Addition to my Kitchen

My favorite new kitchen item has been the best addition to my kitchen.  With some money that I got for Christmas, I started the search for the newest member of my kitchen family.  I immediately thought about getting a salt pig.  If you've never heard of one, you probably are now picturing a dead pig covered in salt (it isn't that).  A salt pig is a container that sits on the counter top and is filled with salt. I was a bit uncomfortable having something that was always open, so instead I began searching for salt boxes.  I found some great salt boxes on the QVC.com website. I chose the box that has two sections.  I have salt in the top one and pepper in the bottom.  It's so easy to just literally put a pinch of salt into the dish or have it ready for my seasoning.  I highly recommend having one of these in your kitchen.  I love my salt and pepper mills, but when you need to add salt, I don't have two hands free to use them.  Also, if there is any kind of steam coming up from the dish, it could cause the salt or pepper to stick in the mill or shaker. If you think this might work for you, I highly suggest these.  They have a variety of sizes and and one even has space for four herbs/spices.  Just go to QVC.com (or anywhere) and type 'salt box' or 'salt pig' into the search box. 

Sunday, January 16, 2011

Creme Brulee

For Christmas, my parents gave me a butane kitchen torch.  I couldn't wait to burn something.  It's so great to have another tool and it's a fun one at that. Sure I could do the same thing by sticking my ramekins until the broiler for a few minutes, but this is the cool way.

For the longest time, I thought Creme Brulee was a touch and complicated recipe.  I thought that because people only had it on special occasions, it was full of expensive ingredients.  Nope, it's basically eggs, cream, sugar and vanilla.  It's basically ice cream with a caramelized sugar on top.

Crème Brulee
2 cups heavy cream
¼ cup white sugar
1 pinch salt
1 tsp. vanilla extract
3 egg yolks
¼ cup white sugar
White sugar for tops

Preheat oven to 300ºF and line the bottom of a large baking pan with a damp kitchen cloth. Bring a large pot of water to boil.

While water is boiling, combine cream, ¼ cup sugar and salt in saucepan over medium heat. Stir occasionally 4 to 5 minutes, until steam rises. In a medium bowl, beat egg yolks and vanilla until smooth. Pour hot cream into yolks, a little at a time, stirring constantly, until all cream is incorporated. Pour mixture into four 6 oz. ramekins.

Place ramekins on towel in baking dish, and place dish on oven rack. Pour boiling water into dish to halfway up the sides of the ramekins. Cover whole pan loosely with foil. Bake 25 to 30 minutes in the preheated oven, until custard is just set.

Chill ramekins in refrigerator 4 to 6 hours. Before serving, sprinkle 1 tablespoon sugar over each custard. Use a kitchen torch or oven broiler to brown top, 2 to 3 minutes.

You can also serve with fruit! If you make it correctly...it should like this afterwards. Enjoy!!

Saturday, January 15, 2011

Lemon Butter Chicken Pasta

This was one of my favorite new dishes that I've tried in a very long time.  I'll give you fair warning, though. If you're not able to keep three or four things going at once, this one is not for you.  Also, it has the calories of a plate of brownies (I'm just guessing, but I'm probably not far off). 

I am not a huge fan of the lemon flavor, but over the last year or so, it has really grown on me more and more.  I'm not saying that I'm going to start squeezing it into my iced tea, but I like it in certain dishes. There's just a hint of lemon in this dish and it's just right.  I chose to leave out the mushrooms (of course) and I also substituted chopped green olives for the capers.  The only reason I switched the olives for the capers was just that I have olives on hand and didn't feel the need to purchase something else that I don't use very often.

Lemon Butter Chicken Pasta
Lemon Butter Sauce:
¼ cup white wine
5 Tbs. fresh lemon juice
5 Tbs. heavy cream
1 cup butter, chilled
salt and pepper to taste

Chicken and Pasta:
½ pound dry farfalle pasta
4 chicken breast halves - pounded to ¼” thickness
1 Tbs. olive oil
1 Tbs. butter
¼ cup all-purpose flour
salt and pepper to taste
4 oz. bacon
6 oz. mushrooms, sliced
6 oz. artichoke hearts, drained and halved
2 tsp. capers, drained
Chopped fresh parsley for garnish

To make the sauce, pour the wine and lemon juice into a saucepan over medium heat. Cook at a low boil until the liquid is reduced by 1/3. Stir in cream, and simmer until it thickens. Gradually add the butter 1 tablespoon at a time to the sauce, stirring until completely incorporated. Season with salt and pepper. Remove from heat, and keep warm.

Bring a large pot of lightly salted water to boil. Add pasta, and cook until al dente, about 8 to 10 minutes. Drain, and set aside.

To make the chicken, heat oil and 2 tablespoons butter in a large skillet over medium heat. In a bowl, stir together flour, salt, and pepper. Lightly coat chicken with flour mixture. Without crowding, carefully place chicken in hot oil. (If necessary, cook in batches.) Fry until cooked through and golden brown on both sides. Remove the chicken to paper towels. Stir the bacon, mushrooms, artichokes, and capers into the oil; cook until the mushrooms are soft.

Cut the chicken breasts into bite-size strips, and return them to the skillet. Stir half of the lemon butter sauce into the chicken mixture.

To serve, place pasta in a large bowl. Stir the chicken mixture into the pasta. Taste, and adjust seasonings. Stir in additional lemon butter sauce as desired. Toss well, and garnish with parsley.

If you are adventurous enough to handle this recipe, then go for it.  It's delicious and I'll definitely keep it in the front of the recipe box (that's a total lie...my recipe box is alphabetized).  Enjoy!!!

Wednesday, January 12, 2011

Sand Art Brownies

This past Christmas, I had my 2nd Annual Christmas Adam Party.  I only get to invite a few people because my house is so small which is really unfortunate, but one day it might become a bigger event.  "What is Christmas Adam?", you might ask. When I was really young, my brother, Dru and I, were always trying to convince our mom to let us open presents before Christmas.  We knew that we would be getting together with family on Christmas Eve to open gifts, but for a kid, that just isn't soon enough.  As a child, I had no clue why 'Christmas Eve' was the name we used for the day before Christmas.  I only knew about Adam and Eve from Sunday School lessons.  I thought it made pretty good sense for the day before Christmas Eve to be named 'Christmas Adam'.  To me, it was logical and sounded like a pretty good day to open a gift on.  Ever since, December 23rd has been Christmas Adam.

Okay, enough back story...as a party favor for my guests, I made Sand Art Brownies.  These brownies are named for the jars of layered sand in various colors.  I made one of these jars in Vacation Bible School as a child.  They're really fun and beautiful until they're turned or shaken.  This is why it is very important for each jar to be completely filled.  The sand are brownies are made in very much the same way.  The dry ingredients for the brownies are layered in a one quart mason jar.  The recipient is given a jar and recipe on how to mix and bake them.

This recipe is to make 12 jars of sand art brownies.  You can present them in whatever method you choose.  I labeled my jars with a tag that says "The Orange Skillet" and also held the recipe. I tied the tag on with a very simple white curling ribbon.

Supplies:
12 quart-sized mason jars with lids and rings
12 ounces cocoa
42 ounces chocolate chips
42 ounces vanilla/white chocolate chips
32 ounces chopped walnuts or pecans
50 ounces brown sugar
5 lbs. flour
5 lbs. white, granulated sugar
salt
1 jar funnel
measuring cups and spoons
several bowls (to pour the chips out into)
1 friend to help you put everything together

Wash all the jars/lids and make sure they are completely dried.  You do not want to take the chance of having anything growing inside your jar. Line your jars up on the counter in a way that will help you remember which jars have already received the ingredients.  Your friend can also help you keep track of this. The messiest part of putting together the jars is the brown sugar.  The brown sugar must be packed into the appropriate sized measuring cup, leveled off and then crumbled into the jar.  I chose to dump out the brown sugar into a bowl and then crumble it into the jar. Once in the jar, the brown sugar needs to be packed before you add the white sugar.  This will help keep your layers looking nicer.

Layer each jar with the following ingredients.  Finish off with the nuts making sure the jar is completely packed so the layers will not move and mix together. If you do not have a 1/8 cup measuring cup, it is equivalent to 2 tablespoons.

3/4 teaspoon salt
1/2 cup + 1/8 cup flour
1/3 cup cocoa
1/2 cup flour
2/3 cup brown sugar
2/3 cup granulated sugar
1/2 cup chocolate chips
1/2 cup vanilla chips
1/2 cup chopped nuts

Seal each jar tightly and decorate in whatever style you wish.  Complete package by adding the recipe for baking the brownies:

1 quart jar Sand Art Brownies

3 eggs, beaten
2/3 cup vegetable oil
1 tsp. vanilla extract
 
Preheat oven to 350°F. Combine all ingredients and mix well. Pour batter into well-greased 13 x 9 pan. Bake for 30 – 35 minutes. Cool and cut.
 
I loved these and I hope the people I gave them to enjoyed them as well.
 

Tuesday, January 11, 2011

French Toast Casserole

When I first found this recipe, I thought, "I have to try this!" If you like french toast, you're sure to like this. The only problem I have with this dish is that it isn't a quick dish.  All in all, it takes about  an hour and a half to prepare and bake and then it really needs to cool for a little bit.  When you bake something for 45 minutes at 350, it isn't safe to eat it right when it comes out.  There really isn't much else to say, but that it serves about four (or less depending on how hungry you are).

French Toast Casserole
5 cups bread cubes
4 eggs
1 ½ cups milk
¼ cup white sugar, divided
¼ teaspoon salt
1 tsp. vanilla extract
1 Tbs. margarine, softened
1 tsp. ground cinnamon

Preheat oven to 350ºF. Lightly butter an 8x8 inch baking pan. Line the bottom of dish with bread cubes. In a large bowl, beat together eggs, milk, 2 tablespoons sugar, salt and vanilla. Pour egg mixture over bread. Dot with margarine; let stand for 10 minutes. Combine remaining 2 tablespoons sugar with 1 teaspoon cinnamon and sprinkle over the top. Bake in preheated oven about 45 to 50 minutes, until top is golden.

I served with maple syrup and it was very tasty.  I hope you enjoy!!

Meatballs

Meatballs are a favorite of many.  You'll find them in various sauces at parties stabbed with multi-colored toothpicks. I have thrown some frozen meatballs into a slow cooker and added the recipe on the side of the Heinz Chili Sauce (recipe: http://www.heinzchilisauce.com/). Today, I chose to add these meatballs to my spaghetti sauce.  If you're a Walmart shopper, I really love the Great Value (Walmart Brand) of traditional sauce.  It's a really great flavor and if you like to doctor it up and do all sorts of things with it.  I use it in my lasagna, Manicotti, spaghetti, and even as a dipping sauce for garlic cheesy bread.  Most recipes I have seen for making your own sauces are very much a long process.  If they're easy, then you're still buying your cans of tomatoes and tomato paste/sauces.  At that point, why not just buy the sauce ready to go and then flavor it with all of your preferences?

This recipe calls for three different kinds of meat: beef, veal and pork.  I'm sure that using all three of these would be delicious, but for cost and ease, I simply used all beef. I also cut this recipe in half because it made too much for my personal needs (which is the same recipe I am posting).  Also, when you're using cheese in a recipe like this (where it is also used to bind ingredients together) it is very important that it be freshly grated.  Besides the fact that it has more flavor when it's fresh, it will blend into your recipe much better.

Meatballs
½ pound ground beef
¼ pound ground veal
¼ pound ground pork
1 clove garlic, minced
1 egg
½ cup freshly grated Romano cheese
2 ¼ tsp. chopped Italian flat leaf parsley
salt and ground black pepper to taste
1 cup stale Italian bread, crumbled
½ cup lukewarm water
Preheat oven to 350 degrees. Combine beef, veal, and pork in a large bowl. Add garlic, eggs, cheese, parsley, salt and pepper. Blend bread crumbs into meat mixture. Slowly add the water ¼ cup at a time. Be careful not to overmix and make meat mixture mushy. The mixture should be very moist but still hold its shape if rolled into meatballs. Shape into meatballs. Line a cookie sheet with parchment or use your silicone baking mat.  Line up your meatballs on the baking mat and bake in oven for 15 minutes. Move meatballs to tray lined with paper towels to drain.  Be advised that you will have a great deal of grease left on the pan.

I really loved the flavor of these meat balls. I hope you enjoy them as well. Let me know if you decide to make them. Enjoy!!

Sunday, January 9, 2011

Apple-Stuffed Chicken and Green Bean Casserole

Welcome back to The Orange Skillet!! I hope everyone had a wonderful Christmas and New Year! Mine was very excellent! I am very excited to get back to writing for the Orange Skillet.  I have neglected my duties of posting recipes since October, but I'm ready to get 2011 started. 

I found this recipe of apple and cheddar-stuffed chicken breasts online and I was really intrigued by the combination of the apple with the cheddar and chicken.  I used Granny Smith apples and (of course) shredded the cheese fresh. I thought that the apple provided more texture than flavor.  The chicken seemed to be missing a little something.  Crumbles of bacon could have been the missing thing, but bacon can go with everything.

The Green Bean Casserole recipe is the one that I got off the can of French's French Fried Onions. You can also find it on the website.  http://www.frenchs.com/recipe/green-bean-casserole-RE1511.html

Apple-Stuffed Chicken Breasts
2 skinless, boneless chicken breasts

½ cup chopped Granny Smith apple
2 Tbs. shredded Cheddar cheese
1 Tbs. Italian-style dried bread crumbs
1 Tbs. butter
¼ cup dry white wine
¼ cup water
1 Tbs. water
1 ½ tsp. cornstarch
1 Tbs. chopped fresh parsley, for garnish

Combine apple, cheese, and bread crumbs. Set aside. Flatten chicken breasts between sheets of waxed paper to 1/4 inch thickness. Divide apple mixture between chicken breasts, and roll up each breast. Secure with toothpicks. Melt butter or margarine in a 7 inch skillet over medium heat. Brown stuffed chicken breasts. Add wine and 1/4 cup water. Cover. Simmer for 15 to 20 minutes, or until chicken is no longer pink. Transfer chicken to a serving platter. Combine 1 tablespoon water and cornstarch; stir into juices in pan. Cook and stir until thickened. Pour gravy over chicken, and garnish with parsley. Serve.

Stay tuned to the Orange Skillet for more fun recipes.  I have lots of things to share that cooked over the holidays. 

Update: My friend Martha suggested using a cheese with a little more bite such as gorganzola.  I totally agree with her. I love gorganzola (and pretty much any other cheese).