Thursday, July 31, 2014

Chicken Enchilada Crescents

Today's recipe comes from my friend, Miriam. She made these for me at the beach a few years ago and they have been an important part of my life ever since. In the last two years, I think I have made these about 30 times.  They're that delicious.  Everyone has raved over them and the people I eat lunch with always comment on how good they smell.

Last year at the beach, I made them for a few friends and now they're addicted as well. My friend, Kristen, has started making these with avocado on top. I think that sounds delicious. Another friend uses Greek yogurt instead of the sour cream.  Whatever you decide to put on top of these tasty creations, you'll eat them fast. 

As good as they are, I never finish all of them, so you'll also be happy to know that they reheat really well. Perfect for taking to work and making everyone jealous of whatever that is that smells so good in your lunchbox.  Here's a helpful tip for taking the sour cream to work.  You don't want to take the entire tub and you can't put the sour cream on them in the container because you have to reheat them (and no one wants hot sour cream).  Spoon just enough sour cream into a Ziploc bag.  When you're ready to eat (after you've heated your Chicken Enchilada Crescents), cut a corner off the bag and squeeze the sour cream onto them.  This is a terrific way to take those condiments with you without having to take the entire bottle. 


Chicken Enchilada Crescents
1 8 oz. Package Crescent Dinner Rolls
2 Lg. Cans of Chicken, Drained
1 cup Shredded Cheese, Taco Blend
2 Cans Rotel Tomatoes, Drained
1/3 Cup Mayonnaise
2 Tbs. Taco Seasoning (or 1 packet)
1-2 tsp. Lime Juice
Crush Tortilla Chips
Sour Cream


Preheat oven to 375ºF.

Stir together chicken, Rotel and cheese. Mix lime juice, mayonnaise and taco seasoning mix and add to chicken. Blend together, but do not over mix.

Unroll crescent dough and separate into triangles. Arrange triangles on a baking sheet. Loosely form the mixture into a ball and place on dough. Wrap all three points of the triangles up over the filling (The filling may not be completely covered.).

Sprinkle crushed chips into a dish. Gently roll the crescents in the crushed tortilla chips. Arrange them on a baking sheet. Bake 20-25 minutes or until golden brown.

Serve with sour cream or guacamole.


Tips:
The key to making sure these come out perfectly is to completely drain the chicken and Rotel. I usually empty the chicken into a colander and squeeze out the excess moisture. I empty that into a bowl and repeat the draining process with the Rotel. 

Once you've mixed all the ingredients together, they will be a little wet.  This is okay.  You want a little moisture so they don't dry out in the oven.  When you're making each crescent

When you're pulling the corners of the crescent up to cover the filling (much like a diaper), make sure that you don't tear the dough.  I have found that making sure the dough is room temperature helps prevent this.  When it's fresh out of the refrigerator, it tends to tear a little more easily.


Now it's time to roll them in the tortilla chips.  I have these breading trays that work perfectly.  I got them from Ollie's a few years ago and they're pretty cool.  They overlap so you don't drip when you're carrying food from one tray to the next.  In this case, you only need to use one bowl or tray.  Just make sure it isn't too large so your chips don't spread out too much. 

Baking these is the easy part.  I prefer to use a silicon mat so nothing sticks.  If you don't have one, use parchment paper.  Never bake a dough while it's in contact with metal.  It won't cook properly.  The silicon mats help to regulate the temperature. As soon as they start to brown, take them out. Don't risk them burning.


Thanks for reading and be sure to comment and share.  Enjoy!!


Wednesday, July 30, 2014

Peeps

This inspiration for this post originally came from a good friend who was pregnant and craving peeps.  I saw the Peep-shaped cookie cutters in Walmart and had a great idea to make her some homemade Peeps. I thought, "I've made marshmallows before, how hard could this be?" Right next to the cookie cutters, I found colored sugar and bought pink and blue (because I didn't know if she was having a girl or a boy at the time).

Marshmallow Peeps

When the time came to actually make the peeps, they were very much like old school Jell-O Jigglers. I remember old commercials of parents and kids making shallow trays of Jell-O and cutting shapes out of them.  This was very much the same.


Once the marshmallow has set (about 10-12 hours), it's time to start cutting out shapes.  I have a silicon baking mat that I use to roll out dough and biscuits.  That mat was perfect for cutting out these shapes (I didn't want marks on my counter tops). I coated the cookie cutters with cooking spray so they wouldn't stick to the marshmallow. Every shape came out perfectly.  I only did a few of the "chick" shapes, because they didn't translate as well in the marshmallow.  The "bunny" shape looked so much better that I used that for pretty much all of them.  You can use any shape you like.


The colored sugar I bought wasn't nearly enough to coat all of the peeps. I was forced to start making my own colored sugar.  I had heard so many ways to do this, but none of them seemed quick and easy.  One method I heard was to use vodka (and I didn't want to waste any vodka).  Having decided that the blue and pink sugar was too granulated to have the same texture as a regular peep, I looked for other methods for my "homemade" colored sugar.  My friend, Annie, suggested putting sugar in the food processor with drops of food coloring.  This was great!  It had the perfect fine consistency to match store bought peeps. Next time, I would use a lot more food coloring to achieve the desired color.  I tried green, yellow and purple.  The purple looked rather horrible (very brown), but the green and yellow were great.


All in all, it was a fun experiment with cool edible results.  If you're ever craving Peeps and can't find them in the stores, here is your way to make them yourself.  I am posting a link to the original post with the marshmallow recipe.  You can use that recipe to make your marshmallows.  I made mine about 1/2 inch to 3/4 inch thick.


Here are a few final pictures of the Peeps that I made.  Make sure you store your final product in an airtight container.  They will dry out as they are exposed to air, so keep them tightly sealed.


Here are the peeps that I made (along with a few friends).  You can see a few of the "chick" versions in yellow.  The shape isn't immediately recognizable (which is why we didn't use them). Make sure you comment and share with friends.  Enjoy!!


Tuesday, July 29, 2014

Skillet S'mores

Most everyone I know loves s'mores, but hardly anyone has a campfire going this time of year. Almost no one has a fire in their fireplaces his time of year (at least not in this part of the country).

Have no fear, your oven is near.  I found this delicious recipe online and decided to give it a try for myself.  It didn't turn out perfectly, but I have a few ideas about how it could go better and will definitely try this again. I am posting a few possible ideas about various changes I would make after the recipe. If you want to give it a go before I can try this again, please let me know how it turned out for you.  Either way, it's going to be delicious.

Skillet S’mores 
¾ cup milk chocolate chips
Marshmallows (small ones, or large ones cut in half)
Graham Crackers

Preheat oven to 450 degrees.

In a small cast iron skillet, arrange the chocolate chips in an even layer. Evenly place the marshmallows on top of the chocolate chips.  Completely cover the chips. Bake in the oven for 6 to 8 minutes or until the marshmallows are lightly browned, or toasted. Remove from the oven and let stand for 5 minutes.

Serve with graham crackers for dipping. Be careful, skillet will be very hot.


The biggest problem I had was that the chocolate chips didn't melt into a smooth dip-like substance.  One possible solution would be to put the chocolate in the pan without the marshmallows.  Heat the chocolate on a lower temperature and mix in a little cooking oil or shortening.  After that, I would add the marshmallows and put the oven on broil to toast them.  

This may have worked differently for me because I used stoneware instead of cast iron.  I don't have a 6 inch cast iron skillet, so that wasn't an option for me.  Another problem, I had was that the graham crackers weren't substantial enough to dip up the chocolate without breaking.  This could be partially due to the first problem, but I can't be certain.  I just used a fork to spread the chocolate and marshmallow on the crackers.  It still tasted and smelled terrific.

Remember to comment and share with friends.  Look for updates and enjoy!!

Monday, July 28, 2014

Pasta Tacos

This is another recipe that the Recipe Whisperer (Shelly Beard), gave me. This is not your typical pasta dish. It isn't usually a Mexican style dish that has pasta in it, but this one is so delicious that you'll never imagine it differently. 

There are loads of options of what to prepare alongside your Pasta Tacos, but I'll just give you a few options. This time, I chose to prepare rice infused with saffron. If you've never tried this type of rice, you really should.  It's very delicious and goes with loads of dishes.  I especially like it with the Chicken Monterrey. Another option, is just to cut up some iceberg lettuce, tomatoes and top with sour cream.  You could also throw in some frijoles refritos (refried beans) if that just isn't enough. You won't get a recipe for those from me, though, because I am not a fan.  

Pasta Tacos
1 ¼ lbs. ground beef
3 oz. cream cheese
1 tsp. salt
1 tsp. chili powder
18 jumbo pasta shells (about half of 12 oz. package)
2 Tbs. butter melted
1 cup (or more) taco sauce
1 cup cheddar cheese, shredded
1 cup Monterey Jack cheese, shredded
1 ½ cups crush tortilla chips (opt.)
1 cup sour cream (opt.)

Preheat oven to 350 degrees.

Brown beef in large skillet, add cream cheese, salt and chili powder. Mix and simmer for 5 minutes. 

Cook pasta in salted water for 8 (or 10) minutes, then toss shells in melted butter. 


Fill shells with meat mixture and arrange in a 9x13 dish; pour taco sauce over shells.  

Note: If you want to prepare this ahead of time, you can stop here and refrigerate until it's time to bake.

Cover with foil and bake for 15 minutes. Top with cheeses and tortilla chips (if you wish), then return to oven to cook for 15 more minutes.  Serve and top with sour cream (and onions if desired).


Give the Pasta Tacos a try.  You will not regret it.  Don't forget to comment and share.  Enjoy!

Friday, July 25, 2014

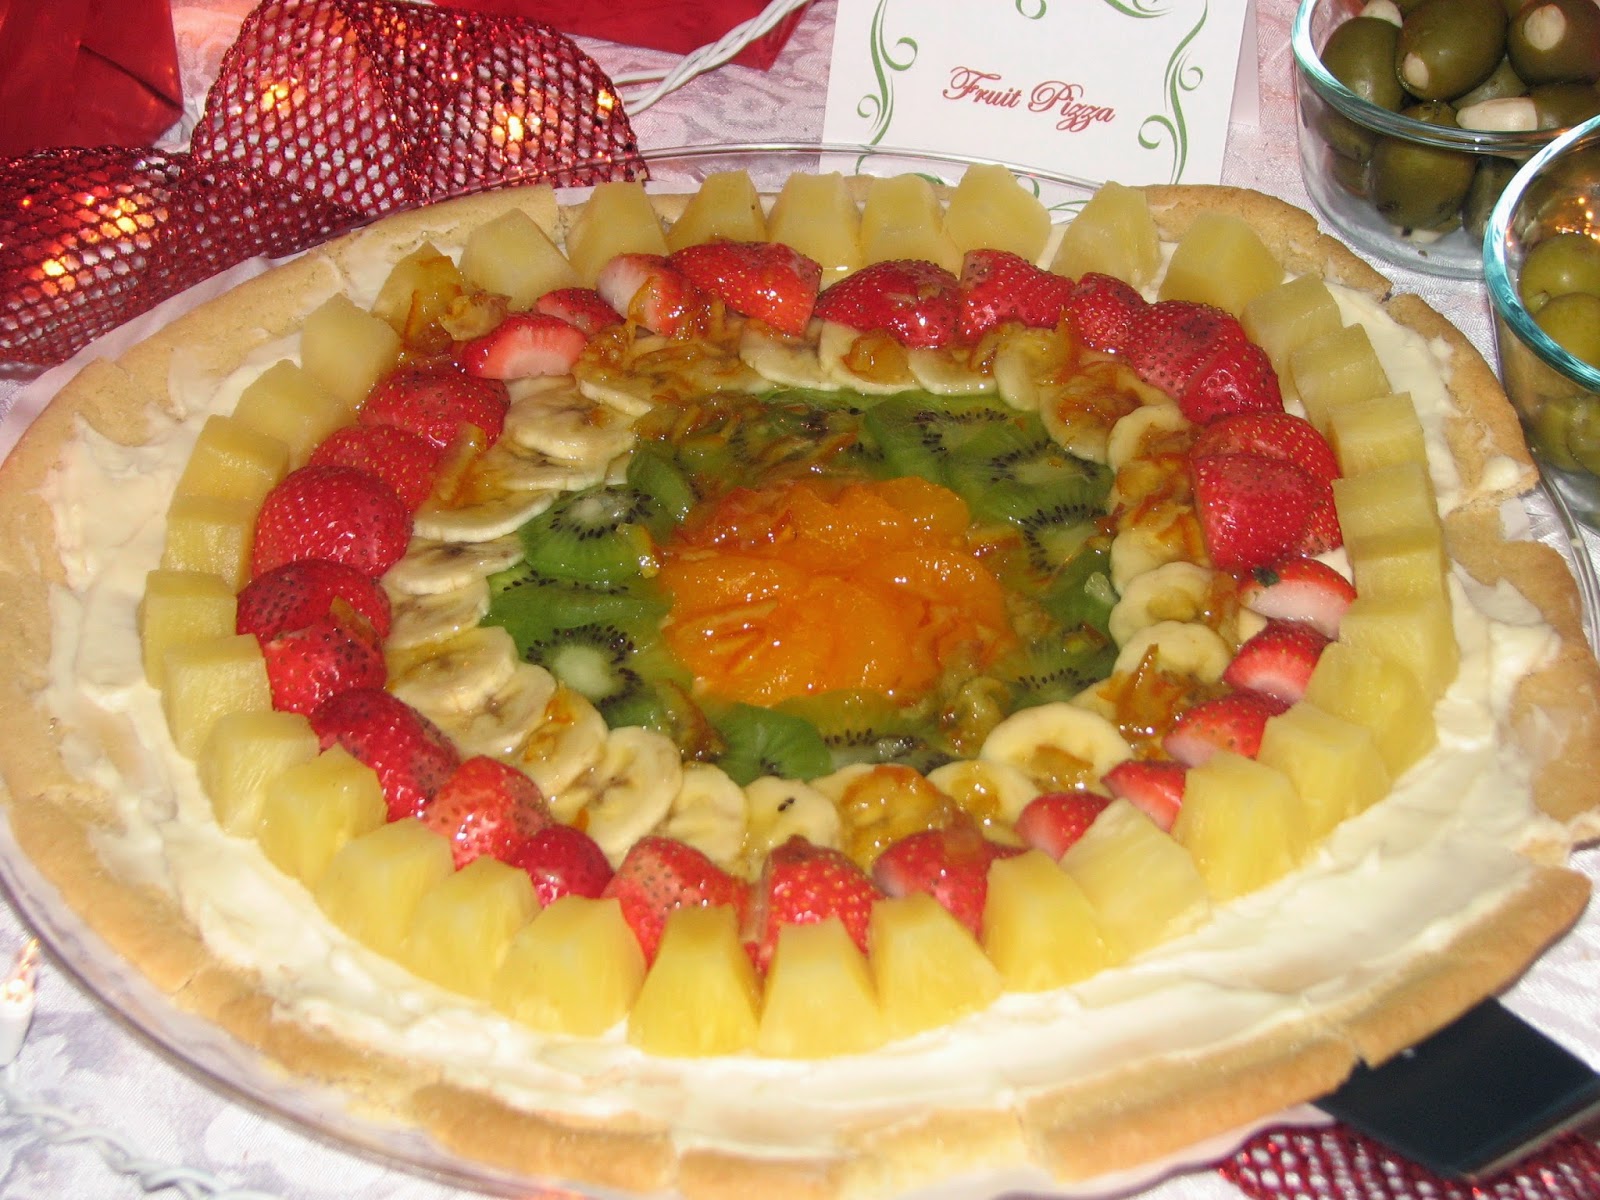
Fancy Fruit Pizza

Having a summer party?  This pizza is definitely a crowd favorite.  I made this several years ago for a few Christmas parties and it went really fast.  Summertime is really the best time for this fruit-topped pizza, though, because everything is in season.

Even though I have a terrific family recipe for sugar cookies, the Pillsbury Sugar Cookie dough in the tube works just as well. After you add all the fruit, it won't make much difference.  If you're making this for a party, you can make the cookie in advance, but you can't frost or top it until just before the party.  You don't want the cookie to become soggy.  I also recommend making this on a pizza stone or something else durable that you can use a pizza cutter with.

I have often wanted to make this again as individual servings.  You could make regular sized sugar cookies and frost and top them with different fruits.  If you want to give this a try let me know and make sure you take pictures.   I would love to see how that turned out.

Fancy Fruit Pizza
1 tube (18 oz.) sugar cookie dough               
1 8 oz. package cream cheese, softened         
1/3 cup sugar                                     
½ tsp. vanilla extract                         
2 medium firm bananas, sliced                     
2 tsp. lemon juice                                          
1 11 oz. can mandarin oranges, drained
2 kiwifruit, peeled and sliced
1 pint fresh strawberries, halved
1 20 oz. can pineapple chunks, drained
1/3 cup orange marmalade
1 Tbs. water


On a greased 14-in. pizza pan (or pizza stone), press cookie dough into a 12-in. circle. Bake at 375º for 10-12 minutes or until golden brown. Cool completely on a wire rack.

In a small mixing bowl, beat the cream cheese, sugar and vanilla until smooth. Spread over crust. Toss bananas with lemon juice.


Arrange the pineapple, strawberries, bananas, kiwi and oranges over cream cheese mixture. Refrigerate for 1 hour. Combine marmalade and water; drizzle over fruit (yields 12 servings).

This first pizza was from a Christmas party several years ago.

This second picture is from a summer party.

I hope you enjoy this.  It's really delicious!


Thursday, July 24, 2014

Empanadas

My knowledge is on this subject is very little, but I do know what I like and what I think tastes good. We made this for Spanish class when I was in high school. Ms. Martin was my Spanish II teacher, and she had all of us bring in various dishes.  My two dishes were empanadas and chicken cilantro (look for that one soon). I couldn't find the recipe for the empanadas that we made, but I could find a recipe that was even better.  The main thing in this recipe is the dough.  The filling can be whatever you like.  Empanadas can be a meat mixture or various fruits to use as a dessert.  Here are a few options.

Empanada Dough
3 cups flour (plus more for kneading)
1 tsp. salt
½ cup cold water
1 egg
1 egg white
1 tsp. vinegar
3 Tbs. shortening

In a bowl, beat the water, egg, egg white and vinegar together. Set aside.

In a separate bowl, mix together the 3 cups of flour and salt. Cut the shortening into the flour mix with a pastry blender or two butter knives. Make a well in the center of the flour mix and pour the liquid ingredients from the first bowl into the center.

Mix the wet and dry ingredients with a fork until it becomes stiff. Turn the dough out onto a lightly floured surface. Knead it just until all the flour is incorporated and the dough is smooth. Wrap the dough in plastic and refrigerate for at least 1 hour, but never more than 24 hours. Prepare the work surface by lightly flouring the area where you plan to roll out the dough.

Tip: If you want to keep the dough longer than 24 hours, you can freeze it.

Place the empanada dough on a floured counter top. Roll the dough out into a 1/8 inch thick layer. Cut the dough into circles with round cookie cutters or biscuit cutters.

Tip: For large empanadas use 6 inch cutters for empanaditas use 3 inch cutters. If you don't have these handy, you can cut out the bottom of a coffee can, rinse it out, and use it as a cutter. Remove the excess dough from the cut out circle. Oddly enough, the ring for my funnel cakes works pretty well.

Place your filling of choice in the center of the circle. Carefully fold over the circle with contents into a semicircle. Crimp down the edges with a fork. If the edges won't stick together, wet your finger and rub it along the inside edge of the dough and try again.


Finish the empanadas by deep frying in vegetable oil at 360 degrees for 1 to 2 minutes per side. They should be lightly golden. Drain on paper towels and serve warm.

Filling Options:
I used beef, onions, garlic and cheese. I cooked the onions and garlic, browned the ground beef and seasoned to my taste.  When filling the shell, don't over fill.  Leave enough room around the edges for crimping.

I have also done this using fruit. I bought a can of apple pie filling and used that on the inside. Once the come out of the oil, sprinkle a mixture of cinnamon and sugar over them immediately.

Online, I have found recipes that involve filling with hard boiled eggs, raisins, beef, olives, etc. You can use pretty much anything you like. Browse the internet for various options.

I have included many pictures in this post that show the various steps of this process.  Be patient with the dough when rolling it out.  It can be a little tricky.


This are wonderful and I really hope you give them a shot.  A friend of mine told me that you can buy the empanada dough pre-made in the freezer sections, but I have yet to find it. Let me know if you do.  Make sure to comment and share with friends. Enjoy!

Wednesday, July 23, 2014

Funnel Cakes

Don't want to wait for the fair to come back before you have another funnel cake?  I completely understand. I didn't either, so I decided to make my own.  A few years ago, a friend bought me this kit, but after I used the one packet of mix, I didn't have a way to make any more funnel cakes.  After some research, I have made my own funnel cake mix that is pretty good (if I do say so myself).  

Note: Make sure you save your oil when finished.  You might want it for tomorrow's recipe.

Before you embark on a quest to make your own funnel cakes, you might want to make sure you have a few supplies.

Metal Forming Ring - This metal ring ensures that the batter will stay in the desired shape when you are pouring the batter into the oil.  Otherwise, it will go all over the pan and lose all shape.

Deep Fry Thermometer - This is to ensure that your oil stays at the proper temperature.  If you have a metal candy thermometer that will work, but do not use a glass or plastic thermometer.  It needs to be especially made for high temperatures.

Dispensing Container - You can always pour the batter through a funnel (which is the reason they're called funnel cakes in the first place).  Another idea that I've seen online is to wash out an old ketchup bottle and fill it with your batter. The kit I received came with a pitcher that is specially made to pour the batter.

Large Skillet that is Deep - You will want to have a deep enough skillet so that you can have a small level of oil with room to spare.

Sifter or Small Strainer - This is to sprinkle the powdered sugar onto the funnel cakes after the come out of the pan.

Long Metal Tongs - This will make it easier to remove the ring and funnel cakes from the oil.

Once you have all these items, you are ready to make funnel cakes. Make this with caution and keep track of the temperature on the oil.  After you make a few, it will cool down a little, so you may have to let it warm back up in between.

Funnel Cakes
½ tsp. salt
2 tsp. baking powder
3 ½ cups all-purpose flour, divided
3 eggs
¼ cup white sugar
2 cups milk
1 tsp. vanilla
Vegetable oil (for frying)
Powdered Sugar (as needed for topping)

Mix salt, baking powder and half the flour in a bowl (set aside). Cream eggs, sugar, vanilla and milk in large bowl. Add flour mixture and beat until smooth. Continue to add remaining flour, but only use enough to achieve desired consistency. Batter will need to be thin enough to run through a funnel.

In large skillet, place metal forming ring and add oil (halfway up ring). Heat the oil to 350º.

Add batter to hot oil. Outline the ring and then fill in center. Remove ring once shape is set. Using metal tongs, flip funnel cake and cook until golden. Remove from oil and sprinkle with sifted powdered sugar.


A few months after I made these, I found the funnel cake mix in the grocery store.  I decided to include a photo of that so you would know what to look for.  It isn't expensive (only $2.50 at Walmart).  It can be found near the pancake batters.


I hope you feel like giving this a shot.  It's really fun and very delicious.  Make sure you have friends ready to help you eat them, because you can't eat a half dozen funnel cakes. Remember to comment and share!  Enjoy!


Tuesday, July 22, 2014

Chocolate Chip Sandwich Cookies

I love to make these, because sometimes a plain chocolate chip cookie just isn't enough. Several years ago, my friend, Erika, had the thought that my butter cream frosting would make these cookies into a wonderful sandwich.  I tried it out at a church pot luck and the container was empty in no time.  My brother liked them so much, that on his last birthday he requested them instead of cake. A few weeks ago, I decided to try making them with chocolate butter cream and the result was even better.  Today, I'm going to give you the recipe for not only the cookie, but for both the vanilla and chocolate butter cream frostings.

This is a basic cookie recipe, but I have made changes to achieve the best results.  I add a little more vanilla and I wrap and chill the dough before baking.  You do not want any air in your cookie dough or the cookies will not bake properly.  On occasion (when I just want a few cookies at a time), I spread the dough in a thin layer between two sheets of parchment.  When I am ready to bake a few, I slice off what I need and put the rest back into the refrigerator. This way, I can have freshly baked cookies and don't overeat. 

Chocolate Chip Cookies
2 ¼ cups all-purpose flour
1 tsp. baking soda
1 tsp. salt
1 cup (2 sticks) butter, softened
¾ cup sugar
¾ cup packed brown sugar
1 1/2  tsp. vanilla extract
2 large eggs
2 cups (12 oz. package) semi-sweet chocolate chips

Combine flour, baking soda and salt in a small bowl and gently whisk; set aside.

In electric mixer, beat butter, granulated sugar, brown sugar and vanilla extract until creamy. Add eggs, one at a time, beating well after each addition. Gradually beat in flour mixture (on a slow speed) adding small amounts at a time. Stir in chocolate chips until evenly distributed. 

Spread dough onto parchment and wrap tightly. Chill dough for at least an hour (more if possible).


Prepare cookie sheets with parchment paper.

Make a circle with your thumb and forefinger.  Fill the center portion with cookie dough for the perfect amount and shape.  Make sure dough is well-packed.

Preheat oven to 350 degrees. Bake for 9 minutes on center rack.

Make sure cookies are cooled somewhat before trying to move them.  Otherwise they will not keep their shape. Allow cookies to finish cooling on a wire rack.


Make sure the cookies are completely cool before you try to fill them with frosting. You don't want the frosting to melt (it is butter after all). The easiest way to fill the cookie sandwiches is to put the frosting in a Ziploc bag. Cut off one corner and squeeze the bag to dispense the frosting onto one side of the cookie. 

Vanilla Butter Cream Frosting
½ cup solid vegetable shortening
½ cup (1 stick) butter, softened
1 tsp. clear vanilla extract
4 cups sifted confectioners' sugar (approximately 1 lb.)
2 Tbs. Karo Syrup
4 Tbs. milk (if needed for consistency)

Medium Consistency
In large bowl, cream shortening and butter with mixer (using whisk attachment). Add vanilla. Gradually add sugar, 1 cup at a time. Beat well on medium speed. When all sugar has been mixed in, icing will appear dry. Add milk and beat at medium speed until light and fluffy. Keep bowl covered with a damp cloth until ready to use.

For best results, keep icing bowl in refrigerator when not in use. Refrigerated in an airtight container, this icing can be stored 2 weeks. Re-whip before using.

Chocolate Butter Cream Frosting
½ cup solid vegetable shortening
½ cup (1 stick) butter softened
¾ cup cocoa
1 tsp. clear vanilla extract
4 cups sifted confectioners' sugar (approximately 1 lb.)
6 Tbs. milk (as needed for consistency) 

In large bowl, cream shortening and butter with electric mixer (using whisk attachment). Add cocoa and vanilla. Gradually add sugar, one cup at a time, beating well on medium speed. Scrape sides and bottom of bowl often. When all sugar has been mixed in, icing will appear dry. Add milk and beat at medium speed until light and fluffy. Keep bowl covered with a damp cloth until ready to use. For best results, keep icing bowl in refrigerator when not in use. Refrigerated in an airtight container, this icing can be stored 2 weeks. Re-whip before using.


Make sure you comment and share with friends.  I hope you enjoy!!

See a full index of The Orange Skillet Recipes here.

Monday, July 21, 2014

Caruso Casserole

My friend, Shelly, first made this casserole for a group of us and I thought it was wonderful.  I love it more and more each time I make it.  I always increase the amount of zucchini and tomato I put in it so that I have more veggies, but either way, it's going to be good.  I usually make sure that I have a total of 4 cups of zucchini and tomatoes. The day I made this one, I only had one tomato, but had loads of fresh zucchini.  I had 3 cups of zucchini and 1 cup of tomato.

If you don't like sausage, feel free to substitute beef or ground turkey (or leave it out altogether), but make sure you season it well, because the sausage usually does some of the job when it comes to flavor.  Also, I tend to mix the entire amount of cheese into the casserole instead of putting some on top.  That way, I have guaranteed cheese in every bite.  There is nothing worse than spooning out a serving of a casserole and much of the topping falls to the side.

Caruso Casserole
1 pound mild Italian sausage
1 cup onions
2 garlic cloves
4 Tbs. butter
4 Tbs. flour
1 tsp. Italian seasoning
½ tsp. salt
¼ tsp. pepper
2 cups milk
3 cups mozzarella cheese, divided
4 cups (½ of 12oz bag) noodles, cooked
1 cup zucchini slices halved
1 cup tomatoes, chopped


Cook egg noodles (if you haven't already).

Preheat oven to 350 degrees.

Cook sausage, onion and garlic in skillet until sausage is brown and crumbly. Drain and set aside.

Melt butter, stir in flour and seasons until smooth. Remove from heat and stir in milk. Bring to a boil over medium heat, stirring constantly for 1 minute. Reduce heat to low and stir in 2 cups of cheese. 

Stir in cooked sausage mixture noodles, zucchini and tomatoes. Turn into buttered 9 x 13 casserole dish and bake for 25 minutes. 

Remove from oven and sprinkle with 1 cup cheese.  Return to oven to melt cheese.


As you can see, instead of the cheese topping, I just mixed it into the rest of the casserole. I really hope you enjoy this.  Make sure you comment and share with friends.

See a full index of The Orange Skillet Recipes here.

Friday, July 18, 2014

Spicy Buffalo Cauliflower Bites

These vegetarian treats are definitely a party favorite.  My friend, William, gave me this recipe and I made them recently for a group of friends. Many could not believe that they were cauliflower.  This dish is definitely for everyone, not just vegetarians. If you like a little spice and less fat than wings, these are right up your alley.  Served with Blue cheese or even plain, I bet you can't eat just one.

Spicy Buffalo Chicken Bites
1 cup water
1 cup all-purpose flower
2 tsp. garlic powder
22 oz. (6 ½ cups) cauliflower florets
¾ cup Franks Hot Sauce
1 Tbs. butter, unsalted, melted
Blue Cheese Dressing

Preheat oven to 450 degrees. Lightly spray a large non-stick baking sheet with cooking spray (I used aluminum foil for easy clean up, but still use the spray).

Combine the water, flour, and garlic powder in a bowl and stir until well-combined.

Coat the cauliflower pieces with the flour mixture (shake off excess) and place on the baking sheet; bake for 20 minutes. While the cauliflower is baking, combine the hot sauce and butter in a small bowl.

Pour the hot sauce mixture over the baked cauliflower and continue baking for an additional 5 minutes (I brushed mine with the sauce instead of pouring...it doesn't waste it). 

Serve with skinny blue cheese dressing if desired and celery sticks.


Serve this and see if you don't cause a stir.  Remember to comment! Enjoy!

See a full index of The Orange Skillet Recipes here.

Thursday, July 17, 2014

Streusel Cake

One of my favorite things to do when I am at the beach, is to get up early and have a cup of coffee on the balcony and watch the ocean.  Sometimes I read, but nothing can match the feeling of the salt air, the sound of the ocean and the cup of coffee...except for maybe this cake. It's the perfect compliment to those things. This Streusel cake is a MUST for beach trips and early mornings with coffee.  Get that coffee brewing and make this cake right away!

Streusel Cake
Cake Ingredients
½ cup butter, softened
2 eggs
1 tsp. vanilla extract
1 cup sugar
1 cup sour cream
2 cups flour
½ tsp. baking soda
1 tsp. baking powder

Streusel Topping
¼ cup flour
¼ cup sugar
¼ cup light brown sugar, packed
½ tsp. cinnamon
2 Tbs. butter, melted
1/3 cup pecans, chopped (optional)

Make the streusel topping by mixing together the flour, sugars and spices, pecans and melted butter.

Directions

Preheat oven to 350. Grease and flour a standard Bundt pan. Mix the streusel ingredients well and set aside. 

Cream butter and sugar together. Beat in eggs and vanilla. Mix in sour cream. Sift together flour, soda and powder and add to the mix. Beat until just combined. Spread half the batter into a greased and floured pan. Sprinkle ¾ of the streusel mix over the batter and the pour the rest of the batter into the pan. Top the cake with the remaining streusel. Bake at 350 for 45 minutes or until a toothpick comes out clean or with moist crumbs. Place on cooling rack and then when cool, invert onto a plate.

Drizzle (optional)
2 Tbs. unsalted butter
1 ½ cups powdered sugar, sifted or whisked
Milk (to use as needed)

In a small bowl, sift the powdered sugar. Make the drizzle by melting the butter in a small saucepan over medium heat and stirring until it just starts to go golden brown. Take off the heat and pour into the powdered sugar. Whisk in the milk a tablespoon at a time until it’s thin enough to drizzle. Drizzle over cooled cake.


Make sure you comment! I hope you enjoy!!

See a full index of The Orange Skillet Recipes here.

Enjoy your cake!