Showing posts with label dessert. Show all posts

Friday, August 8, 2014

Summer Sand Pudding

I want to start by saying that it isn't really sand.  I don't care how much it looks like sand, it isn't sand. It turns out that a box of vanilla wafers and a few Oreos can make very realistic looking  and edible "sand". I recently took this to a party and it won an award.  The mission was to bring the outside to the inside with either an appetizer or a dessert. I figured that a bucket of sand would be perfect. I got a Trader Joe's gift card and a Pepper Mill.

For starters, you're going to need a good food processor. I have a 13 cup Kitchen Aid Food Processor and it worked beautifully for this.  I didn't need nearly that capacity so a smaller processor should handle this job fine. If you're worried about this, you can crush them in two different batches. You will be surprised at how amazing this smells.  I couldn't believe that just vanilla wafers and Oreos could smell that wonderful.

Anytime you're mixing something with cream cheese or butter, make sure it is super soft.  This requires planning a little. I usually put the butter and cream cheese out on the counter in the morning when I know I'm going to make something like this. If I'm making a cake, I'll get the eggs out as well. They will fluff much better at room temperature. In this recipe, I put the cream cheese and butter into the mixer with the paddle attachment and creamed them along with the powdered sugar.  Make sure the cream cheese and butter are completely smooth before you add any other ingredients. Otherwise, you'll have clumps of cream cheese instead of a smooth texture with the flavor of cream cheese.

The recipe didn't say to refrigerate the French Vanilla pudding before you added it to the cream cheese mixture, but I highly recommend it.  It helps with the overall texture by letting the pudding thicken a little before you add it to the mixer. I would say that the flavor of this pudding is much like banana pudding, but without the banana part. If you wanted to add bananas, you certainly could do that, but it doesn't need them. 

Layer the pudding in your dollar store sand bucket that you've thoroughly cleaned. I did three layers. Make sure you smooth the pudding out before you add sand to that layer.


Just before you add the finishing layer of sand, clean up the edges around the bucket. It's much easier to do this before you add that last bit of sand.


When you're finishing off the sand, don't over do the smoothing effect.  I think that leaving it somewhat messy makes it look more like actual sand and less like a crumb topping. A friend suggested building a small sandcastle on top. If you do that, please send pictures.


Summer Sand Pudding

1 package Vanilla Wafers
3 or 4 Oreos (it only takes a few)
8 oz cream cheese, softened
¼ cup butter, softened
2/3 cup powdered sugar
2 small packages French Vanilla pudding mix
2 ¾ cup milk
12 oz Cool Whip


Crush Oreos and Vanilla Wafers in a food processor.  They should be the consistency of sand.

In a separate bowl, cream together softened 8 oz cream cheese, butter, and powdered sugar. In another bowl, mix pudding with milk.  Add to cream cheese mixture. 

Fold in cool whip.  Layer into buckets with sand, pudding, sand etc. Serve with sand shovel.


Enjoy your award winning Summer Sand Pudding. Beware, you'll probably have to reassure people that they aren't about to eat sand. It looks that real. Remember to comment, share and enjoy!! Have fun!

Thursday, August 7, 2014

Devil's Food Cake with Black Pepper Buttercream

For the 100th Orange Skillet Post, I've decided to post a recipe that's truly special.  This cake has quickly become one of my very favorite cakes and if you try it, you will love it, too.

Back in April my friend, Nate, sent me a link to this recipe that was listed on the New York Times website. I knew that I had to immediately try it. The cake itself is pretty straight forward. Three layers of delicious devil's food. The recipe called for preparing the cake pans a little differently than I've done before, though. I have never used cocoa powder to prepare the cake pans.  It worked pretty well, but was a little more tedious than using flour.  I highly recommend following the directions of putting the parchment paper in the bottom of the cake pan. I did this the first time and each layer came out like a dream.  The second time I made this cake, I didn't and they were a little fussy and I had one almost fall apart.

There are two frostings for this cake. The Black Pepper Buttercream goes between the layers and the Chocolate Fudge Frosting covers the outside of the cake. Both of these are absolutely essential in making this cake wonderful. I had a lot of trouble with the original recipe for the Black Pepper Buttercream and was forced to modify it to make it a little easier and a lot less fussy. I know what most of you might be thinking, "black pepper?" I thought it too, but the pepper on enhances the chocolate flavor. You don't even taste the black pepper, but it really does bring out the chocolate flavors. I will attach the link to the original recipe so you can compare the two if you like.  The original buttercream was made with an egg white base, but my version uses a milk and flour base.

In this recipe, you'll notice that made of the ingredients have weights beside them. The original recipe had weight measurements as well as volume measurements (which is what most are used to).  If you have a food scale, it is so much easier (and faster) to weigh your ingredients rather than to measure by volume. It's also a more exact measurement.  A few years ago my friend, Cindy, told me she did this and it was really useful. I bought a scale and she was right. I have written in weight measurements on a lot of my baking recipes. I find it especially useful for ingredients like flour and butter that require more than one scoop or stick to complete the recipe.  

The buttercream also calls for the seeds of one vanilla bean. If you never done this before, no worries, it's very simple.  All you have to do is slice the vanilla bean in half lengthwise. Then, using the blade of your knife, scrape the seeds off of each half. Once you have done it, it seems much easier than you were probably expecting.

The fudge recipe requires that it be whipped while sitting the bowl in an ice bath. The best way to do this is to find two "nesting" bowls.  I found that metal bowls work best.  I bought the stainless steel set from pampered chef several years ago and they worked perfectly.  In the large bowl, fill it about halfway with ice. Pour a little warm water over the ice to begin the melting process. In the smaller bowl, you will have your chopped chocolate, butter and vanilla.  Once you pour your warmed cream mixture over the chocolate, place the smaller bowl into the large bowl. The ice water will chill the mixture as you whisk it with your handheld mixer. The fudge will lighten in color and fluff up like any other frosting.

Devil’s Food Cake with Black Pepper Buttercream

Devil’s Food Cake
10 Tbs. butter, unsalted, softened (140 g)
2/3 cup cocoa powder, natural & unsweetened (70 g)
¾ cup whole milk
2 cups cake flour (200 g)
1 ½ tsp. baking soda (10 g)
½ tsp. baking powder (3 g)
½ tsp. salt, more as needed (3 g)
1 ¾ cups sugar, granulated (350 g)
3 large eggs
2 tsp. vanilla extract


Black Pepper Buttercream
4 ½ Tbs. flour, rounded
1 ½ cups whole milk
1 ½ cup sugar, granulated (300 g)
Large pinch of kosher salt
3 sticks plus 2 Tbs. unsalted butter, softened
1 vanilla bean pod, split with seeds scraped
2 tsp. course ground black pepper (10 g)


Fudge Frosting
1 ½ cups sugar, granulated (300 g)
1 cup heavy cream
Pinch kosher salt
6 oz. unsweetened chocolate, coarsely chopped (170 g)
8 Tbs. butter, unsalted, diced (112 g)
2 tsp. vanilla extract


Cake: Preheat oven to 350 degrees. Grease 3 (8-inch) round baking pans, line the bottoms of each with a round of parchment paper and grease the paper. Use a little cocoa powder to coat the insides of the pans, rotating pans so the cocoa comes up the sides, then tap out excess.

In a small bowl, whisk together cocoa powder and 2/3 cup boiling water. Whisk in milk. In a separate bowl, whisk together cake flour, baking soda, baking powder and salt.

In a large mixing bowl fitted with the paddle attachment, beat butter and sugar until fluffy. Beat in eggs 1 at a time, until incorporated. Beat in vanilla. With the mixer running on low speed, beat in a third of the dry ingredients, followed by half the cocoa mixture. Add remaining portions, alternating between two mixtures. Beat until smooth.

Divide batter evenly among prepared pans. Bake until the centers of the cakes are firm to the touch, 30 to 40 minutes. Cool cakes in their pans on a wire rack for 10 minutes; turn them out onto the rack to cool completely. (Peel off parchment paper if it sticks to the cakes.)

Buttercream: Fill a medium pot halfway with water (or use a double-boiler) and bring to a simmer. In a heatproof bowl that fits over pot, whisk together flour, milk and salt. Cook, whisking constantly, until the mixture resembles oatmeal. Transfer to mixing bowl and chill. Using mixer, whip mixture and beat in butter a little at a time, until the frosting is smooth and spreadable. Beat in vanilla bean seeds and pepper.

Using a serrated knife, slice each cake in half horizontally. Place one bottom layer on a large platter or cake stand. Top evenly with a thin layer of buttercream. Repeat, alternating between cake and frosting, ending with a layer of cake. Cover cake loosely with plastic wrap and refrigerate while you prepare fudge frosting. (Cake can rest in the refrigerator for up to 1 day.)

Fudge: In a medium saucepan over medium heat, combine sugar, heavy cream and salt. Simmer, stirring occasionally, until sugar completely dissolves, about 5 minutes. Scrape mixture into a bowl. Stir in chocolate, butter and vanilla until smooth. Set bowl over a larger bowl filled with ice. Use a hand mixer or an immersion blender with the whisk attachment to whip until mixture is thick and cool, about 5 minutes. Spread frosting over the top and sides of the cake.

NOTE Measurements for dry ingredients are given by weight for greater accuracy. The equivalent measurements by volume are approximate.


This cake is baked in three layers, but frosted in six layers.  When you're cutting your three layers in half it helps to have a long serrated bread knife. Make sure you have a nice flat surface. I usually keep my free hand on top of the layer to help me judge the thickness as I'm cutting through.  You can also buy a special device for this task that helps to cut layers evenly, but I really don't feel that it warrants its own tool. Just go slowly and remember that frosting can glue it back together.  The beauty of having a cake with this many layers is that you almost get more frosting than cake in each slice.


This is also a very tall cake. It will not fit into my glass cake stand. My $5.00 Rubbermaid cake carrier fits it nicely, though.  Sometimes, I put a 'cake circle' under the cake so I can move it if I need to. It's just a small piece of cardboard.  This allows you to store your cake in a big enough container and when you're serving the cake, you can transfer it to your pretty glass server.


If you don't believe that this is an amazing cake, give it a try and let me know how it turns out. This is a link to the original recipe that I got from the New York Times. Just be aware that I have modified it from that recipe so it won't match up.


Remember to comment, share and enjoy your delicious Devil's Food Cake!!

Tuesday, August 5, 2014

Coffee Cup Brownies

Have you ever been sitting in front of the television wishing you had something sweet, but didn't want to take the time to make something?  Have you ever made brownies and not had the will power to keep from eating the entire pan?  I have the answer to both of these questions.  Why not just make a smaller portion in only a few minutes.

A few years ago my friend, Helen, gave me this recipe.  I have used it countless times since that time I have made these on many occasions. These brownies are named Coffee Cup Brownies because they are actually made in coffee cups.Just enjoy delight for one person to enjoy. I own these cool little things by Rachael Ray called Bubble and Browns.  They're roughly the same size as a coffee cup and perfect for this recipe.


Of course, I have used a regular coffee up, but there are a few things you might want to consider.  Make sure your coffee cup has no metallic embossing.  You are going to be making these in the microwave so naturally, no metal. Also, teacups are probably either too thin or incorrectly shaped for this to turn out well.

Coffee Cup Brownies
¼ cup all-purpose flour
¼ cup Sugar
2 Tbs. Cocoa (1/8 cup)
Dash of salt
2 Tbs. oil (1/8 cup)
2 Tbs. water (1/8 cup)


In a small bowl, whisk together the dry ingredients (I use a small whisk and do this to sift the ingredients). Add oil and water and whisk until smooth. Transfer batter to coffee cup (or another small microwavable container) and microwave for 1 minute and 30 seconds. 

Allow time to cool or brownies will fall apart.


I recommend serving these with a scoop of ice cream and caramel syrup, but you can do whatever you like. As always, comment and share!  Enjoy!!

Wednesday, July 30, 2014

Peeps

This inspiration for this post originally came from a good friend who was pregnant and craving peeps.  I saw the Peep-shaped cookie cutters in Walmart and had a great idea to make her some homemade Peeps. I thought, "I've made marshmallows before, how hard could this be?" Right next to the cookie cutters, I found colored sugar and bought pink and blue (because I didn't know if she was having a girl or a boy at the time).

Marshmallow Peeps

When the time came to actually make the peeps, they were very much like old school Jell-O Jigglers. I remember old commercials of parents and kids making shallow trays of Jell-O and cutting shapes out of them.  This was very much the same.


Once the marshmallow has set (about 10-12 hours), it's time to start cutting out shapes.  I have a silicon baking mat that I use to roll out dough and biscuits.  That mat was perfect for cutting out these shapes (I didn't want marks on my counter tops). I coated the cookie cutters with cooking spray so they wouldn't stick to the marshmallow. Every shape came out perfectly.  I only did a few of the "chick" shapes, because they didn't translate as well in the marshmallow.  The "bunny" shape looked so much better that I used that for pretty much all of them.  You can use any shape you like.


The colored sugar I bought wasn't nearly enough to coat all of the peeps. I was forced to start making my own colored sugar.  I had heard so many ways to do this, but none of them seemed quick and easy.  One method I heard was to use vodka (and I didn't want to waste any vodka).  Having decided that the blue and pink sugar was too granulated to have the same texture as a regular peep, I looked for other methods for my "homemade" colored sugar.  My friend, Annie, suggested putting sugar in the food processor with drops of food coloring.  This was great!  It had the perfect fine consistency to match store bought peeps. Next time, I would use a lot more food coloring to achieve the desired color.  I tried green, yellow and purple.  The purple looked rather horrible (very brown), but the green and yellow were great.


All in all, it was a fun experiment with cool edible results.  If you're ever craving Peeps and can't find them in the stores, here is your way to make them yourself.  I am posting a link to the original post with the marshmallow recipe.  You can use that recipe to make your marshmallows.  I made mine about 1/2 inch to 3/4 inch thick.


Here are a few final pictures of the Peeps that I made.  Make sure you store your final product in an airtight container.  They will dry out as they are exposed to air, so keep them tightly sealed.


Here are the peeps that I made (along with a few friends).  You can see a few of the "chick" versions in yellow.  The shape isn't immediately recognizable (which is why we didn't use them). Make sure you comment and share with friends.  Enjoy!!


Tuesday, July 29, 2014

Skillet S'mores

Most everyone I know loves s'mores, but hardly anyone has a campfire going this time of year. Almost no one has a fire in their fireplaces his time of year (at least not in this part of the country).

Have no fear, your oven is near.  I found this delicious recipe online and decided to give it a try for myself.  It didn't turn out perfectly, but I have a few ideas about how it could go better and will definitely try this again. I am posting a few possible ideas about various changes I would make after the recipe. If you want to give it a go before I can try this again, please let me know how it turned out for you.  Either way, it's going to be delicious.

Skillet S’mores 
¾ cup milk chocolate chips
Marshmallows (small ones, or large ones cut in half)
Graham Crackers

Preheat oven to 450 degrees.

In a small cast iron skillet, arrange the chocolate chips in an even layer. Evenly place the marshmallows on top of the chocolate chips.  Completely cover the chips. Bake in the oven for 6 to 8 minutes or until the marshmallows are lightly browned, or toasted. Remove from the oven and let stand for 5 minutes.

Serve with graham crackers for dipping. Be careful, skillet will be very hot.


The biggest problem I had was that the chocolate chips didn't melt into a smooth dip-like substance.  One possible solution would be to put the chocolate in the pan without the marshmallows.  Heat the chocolate on a lower temperature and mix in a little cooking oil or shortening.  After that, I would add the marshmallows and put the oven on broil to toast them.  

This may have worked differently for me because I used stoneware instead of cast iron.  I don't have a 6 inch cast iron skillet, so that wasn't an option for me.  Another problem, I had was that the graham crackers weren't substantial enough to dip up the chocolate without breaking.  This could be partially due to the first problem, but I can't be certain.  I just used a fork to spread the chocolate and marshmallow on the crackers.  It still tasted and smelled terrific.

Remember to comment and share with friends.  Look for updates and enjoy!!

Friday, July 25, 2014

Fancy Fruit Pizza

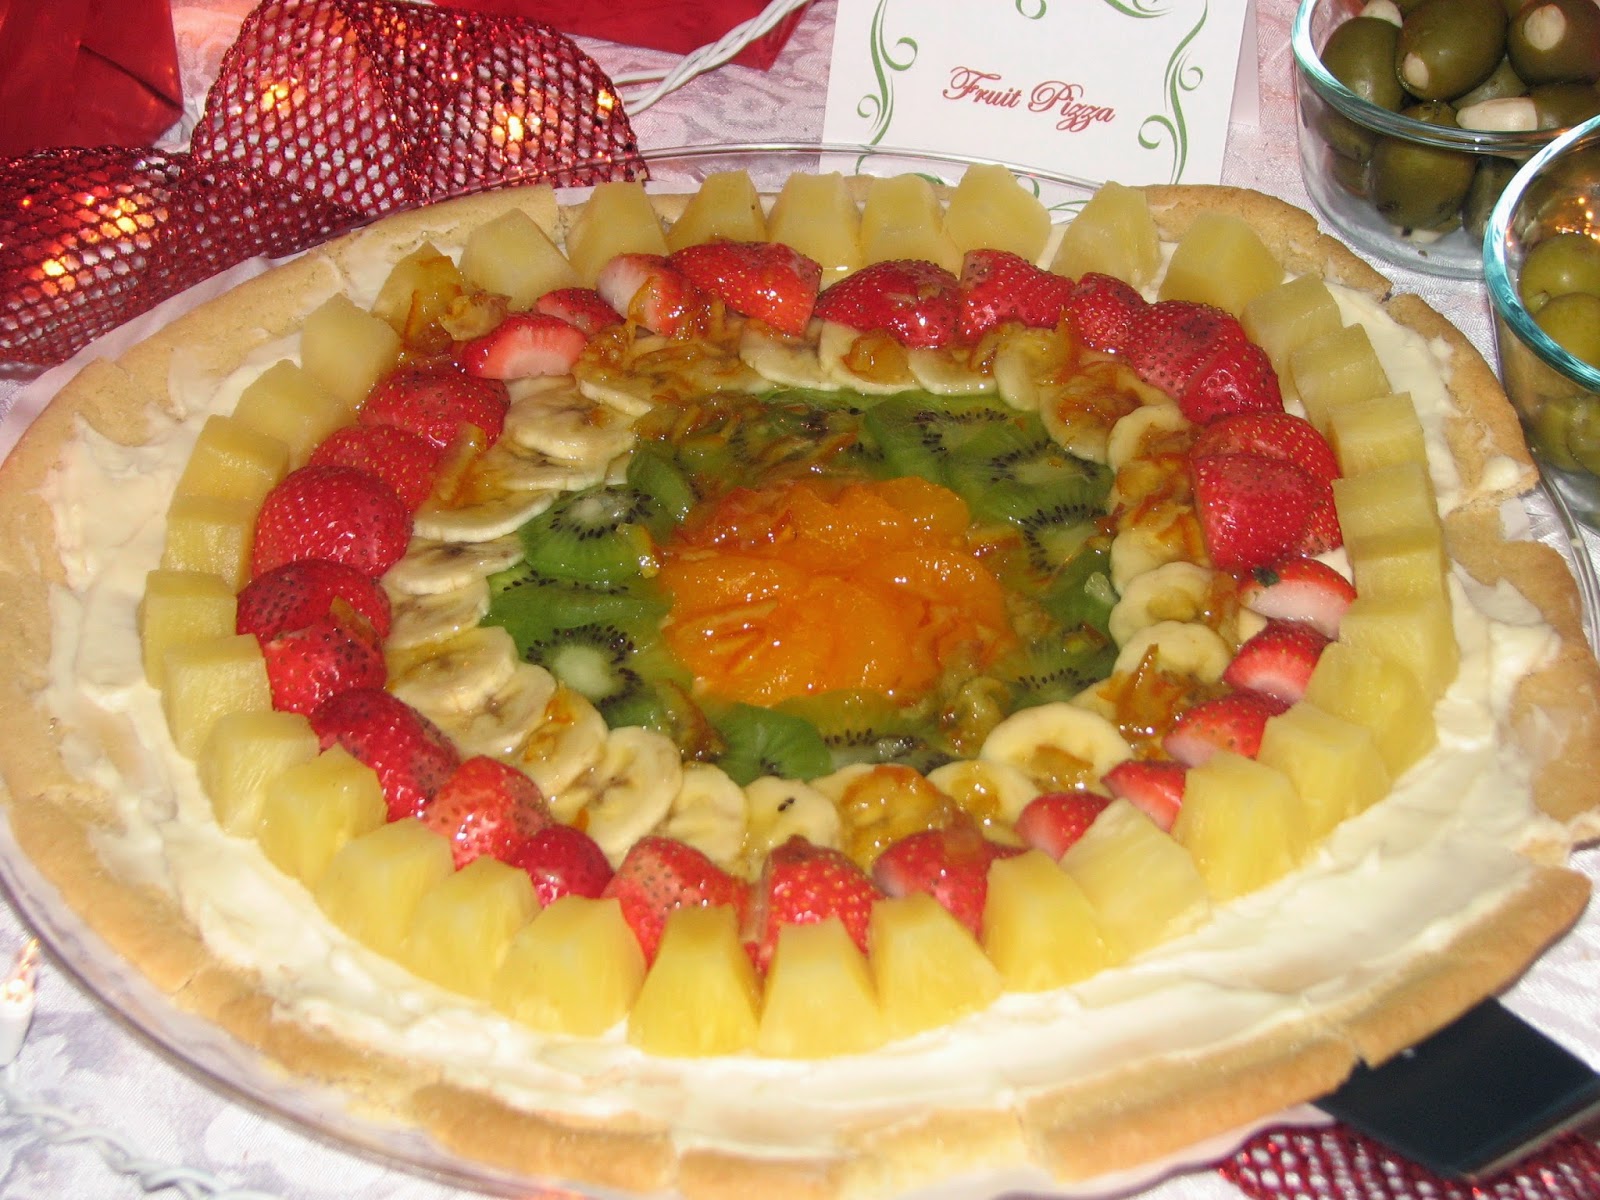
Having a summer party?  This pizza is definitely a crowd favorite.  I made this several years ago for a few Christmas parties and it went really fast.  Summertime is really the best time for this fruit-topped pizza, though, because everything is in season.

Even though I have a terrific family recipe for sugar cookies, the Pillsbury Sugar Cookie dough in the tube works just as well. After you add all the fruit, it won't make much difference.  If you're making this for a party, you can make the cookie in advance, but you can't frost or top it until just before the party.  You don't want the cookie to become soggy.  I also recommend making this on a pizza stone or something else durable that you can use a pizza cutter with.

I have often wanted to make this again as individual servings.  You could make regular sized sugar cookies and frost and top them with different fruits.  If you want to give this a try let me know and make sure you take pictures.   I would love to see how that turned out.

Fancy Fruit Pizza
1 tube (18 oz.) sugar cookie dough               
1 8 oz. package cream cheese, softened         
1/3 cup sugar                                     
½ tsp. vanilla extract                         
2 medium firm bananas, sliced                     
2 tsp. lemon juice                                          
1 11 oz. can mandarin oranges, drained
2 kiwifruit, peeled and sliced
1 pint fresh strawberries, halved
1 20 oz. can pineapple chunks, drained
1/3 cup orange marmalade
1 Tbs. water


On a greased 14-in. pizza pan (or pizza stone), press cookie dough into a 12-in. circle. Bake at 375ยบ for 10-12 minutes or until golden brown. Cool completely on a wire rack.

In a small mixing bowl, beat the cream cheese, sugar and vanilla until smooth. Spread over crust. Toss bananas with lemon juice.


Arrange the pineapple, strawberries, bananas, kiwi and oranges over cream cheese mixture. Refrigerate for 1 hour. Combine marmalade and water; drizzle over fruit (yields 12 servings).

This first pizza was from a Christmas party several years ago.

This second picture is from a summer party.

I hope you enjoy this.  It's really delicious!


Thursday, July 24, 2014

Empanadas

My knowledge is on this subject is very little, but I do know what I like and what I think tastes good. We made this for Spanish class when I was in high school. Ms. Martin was my Spanish II teacher, and she had all of us bring in various dishes.  My two dishes were empanadas and chicken cilantro (look for that one soon). I couldn't find the recipe for the empanadas that we made, but I could find a recipe that was even better.  The main thing in this recipe is the dough.  The filling can be whatever you like.  Empanadas can be a meat mixture or various fruits to use as a dessert.  Here are a few options.

Empanada Dough
3 cups flour (plus more for kneading)
1 tsp. salt
½ cup cold water
1 egg
1 egg white
1 tsp. vinegar
3 Tbs. shortening

In a bowl, beat the water, egg, egg white and vinegar together. Set aside.

In a separate bowl, mix together the 3 cups of flour and salt. Cut the shortening into the flour mix with a pastry blender or two butter knives. Make a well in the center of the flour mix and pour the liquid ingredients from the first bowl into the center.

Mix the wet and dry ingredients with a fork until it becomes stiff. Turn the dough out onto a lightly floured surface. Knead it just until all the flour is incorporated and the dough is smooth. Wrap the dough in plastic and refrigerate for at least 1 hour, but never more than 24 hours. Prepare the work surface by lightly flouring the area where you plan to roll out the dough.

Tip: If you want to keep the dough longer than 24 hours, you can freeze it.

Place the empanada dough on a floured counter top. Roll the dough out into a 1/8 inch thick layer. Cut the dough into circles with round cookie cutters or biscuit cutters.

Tip: For large empanadas use 6 inch cutters for empanaditas use 3 inch cutters. If you don't have these handy, you can cut out the bottom of a coffee can, rinse it out, and use it as a cutter. Remove the excess dough from the cut out circle. Oddly enough, the ring for my funnel cakes works pretty well.

Place your filling of choice in the center of the circle. Carefully fold over the circle with contents into a semicircle. Crimp down the edges with a fork. If the edges won't stick together, wet your finger and rub it along the inside edge of the dough and try again.


Finish the empanadas by deep frying in vegetable oil at 360 degrees for 1 to 2 minutes per side. They should be lightly golden. Drain on paper towels and serve warm.

Filling Options:
I used beef, onions, garlic and cheese. I cooked the onions and garlic, browned the ground beef and seasoned to my taste.  When filling the shell, don't over fill.  Leave enough room around the edges for crimping.

I have also done this using fruit. I bought a can of apple pie filling and used that on the inside. Once the come out of the oil, sprinkle a mixture of cinnamon and sugar over them immediately.

Online, I have found recipes that involve filling with hard boiled eggs, raisins, beef, olives, etc. You can use pretty much anything you like. Browse the internet for various options.

I have included many pictures in this post that show the various steps of this process.  Be patient with the dough when rolling it out.  It can be a little tricky.


This are wonderful and I really hope you give them a shot.  A friend of mine told me that you can buy the empanada dough pre-made in the freezer sections, but I have yet to find it. Let me know if you do.  Make sure to comment and share with friends. Enjoy!

Wednesday, July 23, 2014

Funnel Cakes

Don't want to wait for the fair to come back before you have another funnel cake?  I completely understand. I didn't either, so I decided to make my own.  A few years ago, a friend bought me this kit, but after I used the one packet of mix, I didn't have a way to make any more funnel cakes.  After some research, I have made my own funnel cake mix that is pretty good (if I do say so myself).  

Note: Make sure you save your oil when finished.  You might want it for tomorrow's recipe.

Before you embark on a quest to make your own funnel cakes, you might want to make sure you have a few supplies.

Metal Forming Ring - This metal ring ensures that the batter will stay in the desired shape when you are pouring the batter into the oil.  Otherwise, it will go all over the pan and lose all shape.

Deep Fry Thermometer - This is to ensure that your oil stays at the proper temperature.  If you have a metal candy thermometer that will work, but do not use a glass or plastic thermometer.  It needs to be especially made for high temperatures.

Dispensing Container - You can always pour the batter through a funnel (which is the reason they're called funnel cakes in the first place).  Another idea that I've seen online is to wash out an old ketchup bottle and fill it with your batter. The kit I received came with a pitcher that is specially made to pour the batter.

Large Skillet that is Deep - You will want to have a deep enough skillet so that you can have a small level of oil with room to spare.

Sifter or Small Strainer - This is to sprinkle the powdered sugar onto the funnel cakes after the come out of the pan.

Long Metal Tongs - This will make it easier to remove the ring and funnel cakes from the oil.

Once you have all these items, you are ready to make funnel cakes. Make this with caution and keep track of the temperature on the oil.  After you make a few, it will cool down a little, so you may have to let it warm back up in between.

Funnel Cakes
½ tsp. salt
2 tsp. baking powder
3 ½ cups all-purpose flour, divided
3 eggs
¼ cup white sugar
2 cups milk
1 tsp. vanilla
Vegetable oil (for frying)
Powdered Sugar (as needed for topping)

Mix salt, baking powder and half the flour in a bowl (set aside). Cream eggs, sugar, vanilla and milk in large bowl. Add flour mixture and beat until smooth. Continue to add remaining flour, but only use enough to achieve desired consistency. Batter will need to be thin enough to run through a funnel.

In large skillet, place metal forming ring and add oil (halfway up ring). Heat the oil to 350ยบ.

Add batter to hot oil. Outline the ring and then fill in center. Remove ring once shape is set. Using metal tongs, flip funnel cake and cook until golden. Remove from oil and sprinkle with sifted powdered sugar.


A few months after I made these, I found the funnel cake mix in the grocery store.  I decided to include a photo of that so you would know what to look for.  It isn't expensive (only $2.50 at Walmart).  It can be found near the pancake batters.


I hope you feel like giving this a shot.  It's really fun and very delicious.  Make sure you have friends ready to help you eat them, because you can't eat a half dozen funnel cakes. Remember to comment and share!  Enjoy!


Tuesday, July 22, 2014

Chocolate Chip Sandwich Cookies

I love to make these, because sometimes a plain chocolate chip cookie just isn't enough. Several years ago, my friend, Erika, had the thought that my butter cream frosting would make these cookies into a wonderful sandwich.  I tried it out at a church pot luck and the container was empty in no time.  My brother liked them so much, that on his last birthday he requested them instead of cake. A few weeks ago, I decided to try making them with chocolate butter cream and the result was even better.  Today, I'm going to give you the recipe for not only the cookie, but for both the vanilla and chocolate butter cream frostings.

This is a basic cookie recipe, but I have made changes to achieve the best results.  I add a little more vanilla and I wrap and chill the dough before baking.  You do not want any air in your cookie dough or the cookies will not bake properly.  On occasion (when I just want a few cookies at a time), I spread the dough in a thin layer between two sheets of parchment.  When I am ready to bake a few, I slice off what I need and put the rest back into the refrigerator. This way, I can have freshly baked cookies and don't overeat. 

Chocolate Chip Cookies
2 ¼ cups all-purpose flour
1 tsp. baking soda
1 tsp. salt
1 cup (2 sticks) butter, softened
¾ cup sugar
¾ cup packed brown sugar
1 1/2  tsp. vanilla extract
2 large eggs
2 cups (12 oz. package) semi-sweet chocolate chips

Combine flour, baking soda and salt in a small bowl and gently whisk; set aside.

In electric mixer, beat butter, granulated sugar, brown sugar and vanilla extract until creamy. Add eggs, one at a time, beating well after each addition. Gradually beat in flour mixture (on a slow speed) adding small amounts at a time. Stir in chocolate chips until evenly distributed. 

Spread dough onto parchment and wrap tightly. Chill dough for at least an hour (more if possible).


Prepare cookie sheets with parchment paper.

Make a circle with your thumb and forefinger.  Fill the center portion with cookie dough for the perfect amount and shape.  Make sure dough is well-packed.

Preheat oven to 350 degrees. Bake for 9 minutes on center rack.

Make sure cookies are cooled somewhat before trying to move them.  Otherwise they will not keep their shape. Allow cookies to finish cooling on a wire rack.


Make sure the cookies are completely cool before you try to fill them with frosting. You don't want the frosting to melt (it is butter after all). The easiest way to fill the cookie sandwiches is to put the frosting in a Ziploc bag. Cut off one corner and squeeze the bag to dispense the frosting onto one side of the cookie. 

Vanilla Butter Cream Frosting
½ cup solid vegetable shortening
½ cup (1 stick) butter, softened
1 tsp. clear vanilla extract
4 cups sifted confectioners' sugar (approximately 1 lb.)
2 Tbs. Karo Syrup
4 Tbs. milk (if needed for consistency)

Medium Consistency
In large bowl, cream shortening and butter with mixer (using whisk attachment). Add vanilla. Gradually add sugar, 1 cup at a time. Beat well on medium speed. When all sugar has been mixed in, icing will appear dry. Add milk and beat at medium speed until light and fluffy. Keep bowl covered with a damp cloth until ready to use.

For best results, keep icing bowl in refrigerator when not in use. Refrigerated in an airtight container, this icing can be stored 2 weeks. Re-whip before using.

Chocolate Butter Cream Frosting
½ cup solid vegetable shortening
½ cup (1 stick) butter softened
¾ cup cocoa
1 tsp. clear vanilla extract
4 cups sifted confectioners' sugar (approximately 1 lb.)
6 Tbs. milk (as needed for consistency) 

In large bowl, cream shortening and butter with electric mixer (using whisk attachment). Add cocoa and vanilla. Gradually add sugar, one cup at a time, beating well on medium speed. Scrape sides and bottom of bowl often. When all sugar has been mixed in, icing will appear dry. Add milk and beat at medium speed until light and fluffy. Keep bowl covered with a damp cloth until ready to use. For best results, keep icing bowl in refrigerator when not in use. Refrigerated in an airtight container, this icing can be stored 2 weeks. Re-whip before using.


Make sure you comment and share with friends.  I hope you enjoy!!

See a full index of The Orange Skillet Recipes here.

Thursday, July 17, 2014

Streusel Cake

One of my favorite things to do when I am at the beach, is to get up early and have a cup of coffee on the balcony and watch the ocean.  Sometimes I read, but nothing can match the feeling of the salt air, the sound of the ocean and the cup of coffee...except for maybe this cake. It's the perfect compliment to those things. This Streusel cake is a MUST for beach trips and early mornings with coffee.  Get that coffee brewing and make this cake right away!

Streusel Cake
Cake Ingredients
½ cup butter, softened
2 eggs
1 tsp. vanilla extract
1 cup sugar
1 cup sour cream
2 cups flour
½ tsp. baking soda
1 tsp. baking powder

Streusel Topping
¼ cup flour
¼ cup sugar
¼ cup light brown sugar, packed
½ tsp. cinnamon
2 Tbs. butter, melted
1/3 cup pecans, chopped (optional)

Make the streusel topping by mixing together the flour, sugars and spices, pecans and melted butter.

Directions

Preheat oven to 350. Grease and flour a standard Bundt pan. Mix the streusel ingredients well and set aside. 

Cream butter and sugar together. Beat in eggs and vanilla. Mix in sour cream. Sift together flour, soda and powder and add to the mix. Beat until just combined. Spread half the batter into a greased and floured pan. Sprinkle ¾ of the streusel mix over the batter and the pour the rest of the batter into the pan. Top the cake with the remaining streusel. Bake at 350 for 45 minutes or until a toothpick comes out clean or with moist crumbs. Place on cooling rack and then when cool, invert onto a plate.

Drizzle (optional)
2 Tbs. unsalted butter
1 ½ cups powdered sugar, sifted or whisked
Milk (to use as needed)

In a small bowl, sift the powdered sugar. Make the drizzle by melting the butter in a small saucepan over medium heat and stirring until it just starts to go golden brown. Take off the heat and pour into the powdered sugar. Whisk in the milk a tablespoon at a time until it’s thin enough to drizzle. Drizzle over cooled cake.


Make sure you comment! I hope you enjoy!!

See a full index of The Orange Skillet Recipes here.

Enjoy your cake!